Background
Since the Bluesky project was announced several years ago as all the craziness with Twitter was going down, I've been super interested in that platform. I loved the idea of being able to take my posts with me and host my own server. I also loved the ability to use a web domain as my handle, further tying my social profile to the rest of my online identity.
Because Bluesky is built on an open platform (now more formally known as the Atmosphere), there are all kinds of possibilities for other ways to use the infrastructure and network. One of the projects that has developed over time is Standard.site. This project builds on the work of other platforms like Leaflet. Leaflet is a blogging platform that utilizes your Bluesky (or Atmosphere) Personal Data Server (PDS) to store your blog content. As a result, your blog content is directly linked to your Bluesky profile as your identity, and is hosted wherever you are already storing the rest of your Atmosphere/Bluesky data.
Standard.site expands on this by creating a standardized set of lexicons (think metadata) that are used by the various groups building blogging services on the Atmosphere. But they thought ahead and created a way to integrate standalone sites as well. If we add the necessary lexicons/metadata to any site, we can create the links in the PDS so that existing blogs can be tied back to the PDS and the Bluesky identity. It also allows my blog posts to show up in reader apps that are aggregating standard.site posts from many different sources.
Integrating with my 11ty Blog
Fortunately, the heavy lifting had already been done by someone else. A Github user, aitorres, has built a plugin for 11ty that performs all the integration components, I just had to implement it. The instructions included in the Github repo are quite good, it didn't leave a ton of guess-work. Essentially what it does is hook into Bluesky to write the necessary standard.site values into your PDS. You authenticate using an App Password from Bluesky.
I added a line to my package.json file that adds the plugin as a dependency.
/package.json
{
    ...
    "dependencies": {
        ...
        "eleventy-plugin-standard-site": "^1.0.0",
    }
}
Then in my eleventy-config.jsfile, I added an import function and then configured the plugin in the export section. As a reminder, you can only have one export section, so you have to include the necessary components in the same export you already have.
/eleventy-config.js
...
import standardSitePlugin from "eleventy-plugin-standard-site";

export default function(eleventyConfig) {
    ...
    // configure standard site plugin
    eleventyConfig.addPlugin(standardSitePlugin, {
        publicationName: "site name",
        publicationUrl: "[site url]",
        identifier: "[bluesky did:plc]",
        password: "[bluesky app password]",
        publicationDescription: "[description of site]",
        // Optional: whether to automatically extract text content from posts
        // and include in their document records, defaults to true
        includeTextContent: true,
        // Optional: whether the publication should appear in discovery feeds, defaults to true
        showInDiscover: true,
        // Optional: PDS URL, defaults to "https://bsky.social"
        pds: "[pds url]",
        // Optional: path to an icon image file to be used in the publication record
        publicationIconPath: "[favicon path]",
    });
}
I replaced all the necessary values with the ones for my Bluesky profile. I am hosting my Bluesky PDS myself, so I had to add the URL of my PDS, but if you aren't doing that, then you could completely delete that line (or comment it out). The Github repo also has some variables for theme colors, but I didn't use those.
The only other step is to add a line to the frontmatter of each post that you want to make visible to other platforms that read standard.site lexicons.
/posts/example-post.md
---
...
standardSiteDocument: true
---
[blog post content]
If you want to prevent standard.site references from being created for a particular post, either remove that line or change the value to false.
How it works
The execution is dead simple, in fact there's actually not anything extra you have to do. At build time, the plugin will run a post-build task to create the standard.site records (if they don't already exist from a previous build) and will modify the HTML output to include the references in the header of each page.
Adding a variable for security
The one thing that's lacking in this implementation is that it's designed to have the password stored in your eleventy-config.jsfile. This creates a security issue when using a public Github repo to store the files. Anyone could find that password and connect to your Bluesky PDS and make changes. So I started looking for a way to store that as a variable that was replaced at build time.
Since I'm using Cloudflare Pages to host the site, I can use the variables and secrets there, I just had to figure out the syntax to reference them. And then I also had to figure out how to also store the variable for local builds on my laptop.
I utilized the dotenv nodejs package to solve this. This allows me to store variables in a .env file, which will be referenced at build time. Cloudflare will piggyback on this because their variables and secrets get exposed in a .env file.
Local Setup
I modified my package.jsonfile again to add this as a dependency.
/package.json
{
    ...
    "dependencies": {
        ...
        "dotenv": "^16.6.1",
    }
}
Then I went back to the eleventy.config.jsfile and added it as an import and export component. The guidance was to import it as early as possible so that it was present for anything that needed it. So I made it my first import. I then modified the standard.site config and replaced the actual password with the variable.
/eleventy.config.js
import 'dotenv/config';
...
export default function(eleventyConfig) {
    ...
    eleventyConfig.addPlugin(standardSitePlugin, {
        ...
        password: (process.env.STANDARD_SITE_PWD),
        ...
    })
}
Now I just had to to add a .env file in the root of my site and populate it with the variable.
.env
STANDARD_SITE_PWD:"password"Be sure to add your
.envfile to your.gitignorefile so that it's not uploaded to Github. That would defeat the entire purpose of adding the variable.
Cloudflare Setup
Now that the local side was taken care of, I needed to add the variable in Cloudflare so that the live site would have the necessary info to build.
In the Settings of the Pages build, there is a section called Variables and Secrets. I added it here as a secret (which prevents it from being viewable anywhere in Cloudflare).
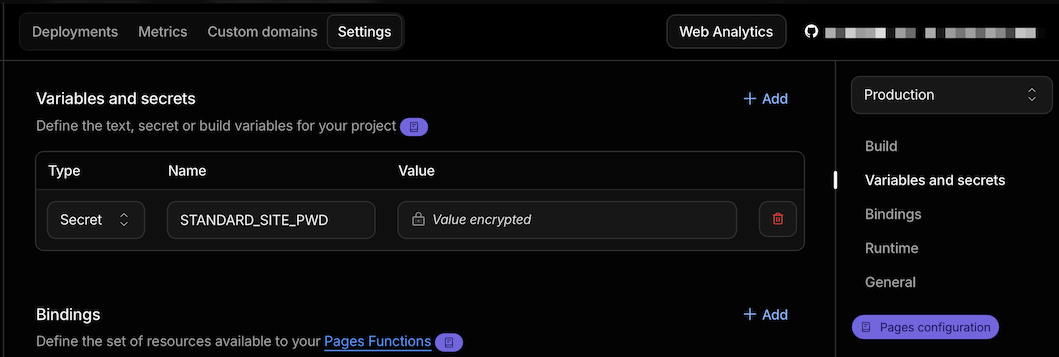
And then because I'm using both preview builds and a production build, I had to change the dropdown in the top right corner and create the same secret in the preview config.
Wrapup
And that's it! Going forward my blog posts are available directly in the Atmosphere by integrating with standard.site, and I was able to use variables to protect my app password in the config file.
Hope this write-up was helpful!